Alrighty, all you fearless and faithful followers, you wanted pictures of our humble abode and I'm happy to finally oblige. I'll warn you ahead of time that I am not a domestic goddess, so don't be offended at any cluttery messes you happen to see :D This entry is l--o--n--g because I wanted to give some description and explanation for what you're seeing and why we did certain things. You might want to go get some coffee and a snack. It's ok, I'll wait for you...

Firstly, here's a quick view of our floorplan so you can see how we've got the space organized in the tent and on the deck. Just click the small image to view a larger version. Dividing the space into rooms with taller furniture helps provide some privacy and a sense of organization. We found that these "walls" made the place feel more homey -- more like a studio apartment than a tent. Keeping the traffic flow clear and the "work triangles" logical has been a bit of a challenge, but I think we've managed fairly well given the limited space.

Let's start our tour at the front door (facing west). This is the zipper end of the tent that doesn't have any vertical aluminum framing poles, so we built a quick 2x4 stud frame for the door and cut a sheet of 3" Insulfoam R-Tech foam board to be the door. The rest of this wall is lined with storage units, so the remaining foam panels are supported by them and just secured to the tent frame on the edges. If you look closely at the top corners of the door, you will see another common Alaska building material -- bungee cords. Bungees are frequently used as hinges and latches; and in our case, they create a latch to keep the door from falling inward when the wind blows. Putting this door directly over the tent zipper
drastically reduced floor drafts caused by the small gap where the zipper meets the floor and the sod cloth at the bottom of the wall is split to allow the flaps to open. Since we had them left over from the Seattle house, we installed peel-n-stick vinyl tiles in the foyer to help protect the ground cloth and contain the slushy mess caused by snowy/muddy boots. To the left is our storage area, and to the right is our hall closet and electrical cabinet. Now that we're oriented, let's begin!

Here you can see the batteries are stored at the bottom of the electrical cabinet. We have a 24v electrical system consisting of two rows of six 12 volt batteries wired in parallel and an inverter, which lets us use standard 120v AC household appliances. When I built the cabinet, I had to think about how I was going to place these suckers so that the weight (about 40 lbs each) would be evenly distributed and supported, and how all the wiring would run to the inverter with the shortest cables possible. For safety, the 3/4" plywood shelf holding the batteries is raised off the floor in case we get any rain/snow leaks, and is supported by an interlocking grid of 1x2 furring strips.

Directly above the battery bank, on the right side of the cabinet, is our 2000 watt inverter which connects to the generator outside (via cable between the tent wall and ground cloth), the battery bank and our electrical panel. Our generator has a built-in inverter so you can plug cords in directly, but the inverter allows us to store power in the batteries and only run the generator for an hour or two ever day to keep the batteries topped off. The remainder of the day, the inverter draws power from the batteries to supply our electricity. In this photo, you can also see all the chargers for our various portable power tools and electronics... yes we have electricity, but it's always good to have battery back-ups. In particular, those two-way radios let us stay in contact with each other when we're out hiking around the property. When not in use, we also store the Honda eu2000 generator on the left side of this shelf (not in frame) so it will stay warm enough to start and run (outside of course!) on the cold days.

And yes, we have a safe electrical system. No hot-wiring here! We've run the power from the inverter to a proper grounded electrical service panel with breakers. In addition to the 20 amp circuit breaker that is between the positive terminal of the batteries and the inverter, this service panel has a two-pole 20 amp main breaker, and two 15 amp breakers serving the two electrical runs (lights and outlets) with 12g 3-wire sheathed Romex (which is rated for 20 amps). Installing the next higher gauge wiring than mandated for the amperage the circuit breaker is rated for helps reduce possible overheating that could lead to a short or fire (if we had any large appliances, we probably would have needed to run 10g on a 20 amp circuit). Since the maximum load the inverter can supply is 20 amps, the multiple breakers help ensure that we will never draw so much at once that we burn out the inverter. They also keep us from discharging the entire battery bank instantaneously and electrocuting ourselves. There is more than enough juice stored in those batteries to kill you instantly if you got it all at once. Don't play fast and loose with electricity, take the time to wire a proper electrical system with appropriate circuit breakers and secure your wires! Our tent's system goes above and beyond most building codes even though there are no regulations in this area... it pays to be safe!
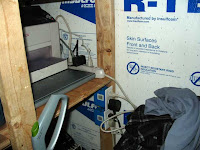
Above the inverter and generator shelf we have our computer and network center, as well as our two outlet boxes. Just because we're living in the boonies doesn't mean we have to suffer -- our network consists of the satellite modem, wireless network hub, a network share (just a big hard drive really), our color laser printer (which stays off most of the time because it's a big power hog), a scanner, and our two laptops. And no, we're not trying for a Griswold Family Christmas with all those power strips plugged into the outlets! The power strips provide additional circuit protection, as well as surge protection for our appliances in case we get power fluctuations. Our inverter is pretty good at providing even power, but off-grid systems are notorious for surging when the generator kicks on and off. Each strip is also zoned with common types of appliances so we can shut down a whole system with one switch when we're not using them. This comes in really handy with the battery chargers and the computer equipment since many of those have transformers in the power supply or status lights that draw a phantom load even when the appliance is off or not in use. On the shelf above this one, we store our DVD collection (in 3-ring binders) just in case we feel like watching a movie or TV series episode on our laptops. The truck and ATV batteries (and the trickle charger) also live on this shelf so they can stay warm, and be charged if needed, when we're not using the vehicle (essential when it's really cold!).

And lastly on the electrical cabinet is our light switches, one for the center overhead in the tent, and one each for the outside back and front porch lights (BTW - CFL bilbs do NOT work worth a poop when it's cold out, use incandescent or LEDs!). All the wiring was run up the frame and along the ridge beam, secured with zip-ties, and then into junction boxes which are attached and grounded to the metal tent frame. This safely grounds all the wiring and the frame should we get struck by lightning or have some bizarre short in the system. Everything is then grounded out to the earth via a huge grounding wire and rod outside.

Ta-da! Let there be light, and there was light, and it was good! On the right side of the picture, you'll notice that we haven't yet installed the insulation in the SE corner around the stove. This is partly because we still need one more sheet of metal heat shield, but also because it gets pretty toasty inside the tent and we sometimes roast ourselves out even though this corner isn't yet insulated (the foam really does work that well!). We do plan to get this corner done before the really cold weather hits in Jan/Feb though! We also didn't insulate the ridge beam. This is partly because cutting thin strips of foam board is a PITA because our jig-saw's knife blade isn't long enough; but mostly it's because it improves ventilation and keeps the roof peak from freezing up. That makes clearing the snow off the roof with a pole or broom
much easier (we thought it might create an ice dam instead, but have found that it doesn't). The aluminum frame poles and steel angle braces are rated to handle our snow load (min 50 psi), but why take chances?!

And our bed. The lovely warm sanctuary at the end of a cold hard day. You may think we're terribly soft and spoiled to have a bed in a tent, but trust me you do not want to sleep on the floor when it's cold. Even though we have 6" of fiberglass batt insulation and 8-mil Visqueen vapor barrier in the floor of the platform, and low-nap industrial berber carpeting, the floor is definitely not warm and most certainly not warm enough to spend any length of time on. The bed is at the same height as the woodstove, so it stays a more comfortable temperature. We also have tons of underbed storage, so it's not a total waste of valuable space ;) The bed frame also provides a convenient space to zip-tie our reading lamps and secure our weapons for the night. If you look closely on the bookshelf to the right of the bed, you'll see the monitor for our weather station, with it's ever handy low temp alarm that wakes me up in the middle of the night to go feed the fire if it gets below 50 inside. Charlie's fleecey hut is stacked on top of her scratching post at the foot of the bed to keep it up in the warm zone (and away from Ripley!) This is convenient for Charlie, not a spring chicken anymore, because she can jump onto the bed easier than the top of the post. It also gives her the choice of hiding in her hut or sprawling on the bed depending on her mood and the temperature. We also feed her on the bed (yes, that is a cat dish) since it's the only way to keep Ripley out of her wet food... she does have dry kibble and water on the floor though, which Ripley has learned to leave alone (finally!). We may eventually move all Charlie's food and water to the top of the dresser since Ripley terrorizes her (erm, wants to play with her) whenever she's on the floor, but I'll have to build her a ramp up there from my nightstand first.

And we now have an even further upgraded deluxe composting toilet. By putting the dresser between the bed and the toilet area and building out the indoor wood crib, we now have much more potty privacy. The additional shelving in the unit comes in handy for storing extra TP, toiletries, first-aid kit and medications, linens, and our laundry equipment (hamper, washboard and wringer). This area also serves to store our folding tables and clothes rack when not in use, and the back of the wood crib was handy to hang the mop, broom and dustpan up off the floor so they can't fall over all the time.
Rule #1 of Small Space Living: let no sturdy vertical surface go unused! Here, I've screwed some wire shelves, normally used in kitchens for spices and small cans, to the back of the dresser to act as a sort of vanity for everyday toiletries. Since this is the back of the dresser, it isn't pretty, so I wasn't worried about marring the finish screwing into it... I just had to be sure that I blocked behind the screws from the inside to make sure the screws wouldn't pull out and keep the screws and blocking short enough that they didn't interfere with the drawer movement.

See? I told you our chainsaws and chain oil live in the house! I figured there was no better place for the chainsaws to live than right above the firewood they'd just cut, so I built this shelf into the wood crib... besides, I don't like stacking wood above my head anyway. My Shindaiwa is in the back because she only starts and stays running when it's warmer than zero. The cold-friendlier Husqvarna gets the place of distinction up front, and the location is really handy as we can grab her on the way out the back door to go buck wood. This indoor wood crib holds about 1/4 cord of firewood, 3-5 days worth in the winter depending on temps, and helps the wood warm up so it'll catch better in the stove. We also keep a few waste bins here for kindling and firestarter... usually sticks and twigs, junk mail, and the occassional cardboard box; but today we actually have a huge box filled with newsprint (the best!) from a Lehman's order (love them!). I cannot stress enough how important it is to use packing materials that either compost or burn when you live out in the bush, there is nothing more irritating than having to drive 20 miles in to the dump just to get rid of styrofoam packing peanuts!

And here's our living room/great room/project space right in front of the wood stove. Please notice our fine furnishings! This is really the only open space in the tent, so it was important that we be able to clear it easily if we needed a place to work on something indoors. That's where folding camp chairs and tray tables come to the rescue! The small bench serves as coffee table, desk and food rest... and sometimes additional counter space in the kitchen. We also have our running water... the 5 gallon orange Igloo water cooler with spout partially hidden by G-man (who was making dinner), and the hanging Platypus water bag with shower attachment; and our sinks, a galvanized tub and two poly wash basins on collapsible wire shelves. Next to the sinks is a hanging closet shoe/sweater organizer (which we wired to the tent frame) that we use to hold handsoap & toothbrushes, washclothes, towels, and some kitchen stuff like matches, storage bags and aluminum foil. Being able to make creative use of easy-to-find items in new and interesting ways to fit your needs is very important when living in a small space, especially a small space that doesn't have hard walls or studs to nail on!

Our kitchen "cabinet" is another example of creative repurposing. We started with one of those 5-drawer poly wheelie carts that you find at Wally-China-Mart on sale all the time. Then we took some double-stick hook-and-loop tape and attached a large cutting board to the top. Voila! Instant kitchen cabinet with countertop, and it's even on wheels so we can move it out of the way or right next to the stove when you need it. To make this unit even more useful and organized, I added a silverware insert in the top drawer to keep our spoons and forks from getting all jumbled up; and I lined the second drawer with that spongy/grippy shelf liner stuff to keep the kitchen knives from 1) punching through the plastic, and 2) moving around and dulling each other. I even managed to get all the pieces of our hand grinder (flour mill, food processor, & meat grinder/slicer) into one of the larger drawers on the bottom... took an hour of intense Tetris-ing, but it did eventually fit ;)

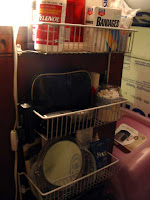
Besides the bed, our pantry area has the most dedicated space in our home. We stocked up on a year's worth of food, and while the extra dried stuff can live in the shed because it won't freeze, the canned stuff and the dried foods we're using currently have to stay inside. We also have our six 7-gallon Aqua-tainers (the blue square things in the foreground) in here so they don't freeze and their thermal mass helps retain more heat to keep the cans from freezing. We tried to organize this space in a logical fashion using folding bookcases and two jumbo quick-assemble poly garage storage units (which also form a wall separating this space from the rest of the tent). Condiments and spices, we use plenty since canned food can get boring, are on the smallest/narrowest bookshelf right at the front where they are easy to access while cooking. Baking and cooking items like vinegars, oil, flour and sugar are in a larger bookcase behind that. And snack and munchies are on another bookcase along the back wall where it's easy to grab them and go. The bottom shelf on the inside corner of both these units serves as our refrigerator as we left a small gap in insulation, which keeps this area around 35 degrees. The two large units have all our canned goods, jars and poly food storage containers of bulk foods as well as some additional kitchen items like cleansers and paper towels. We have a large office bookcase on the end for items like empty poly storage containers and jars, measuring cups and colanders because they're handy to the kitchen area. We also have all our board and car games on this bookcase since it's in back of the the living room.

And around the back side of the pantry storage units, returning back to the "hall", we put up our nifty IKEA CD/DVD shelves to make cubby storage for all the little bits and pieces of stuff we didn't have any other home for. This is where we put things like vitamins, (right on the corner so we remember to take them!), candles and flashlights, sewing kit, gloves/hats/scarves, and our keys where they are all handy as you enter and exit.
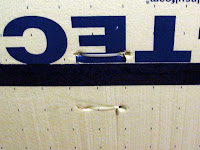
Here's a close-up of our foam board installation technique. We bored a hole in the panels with an awl, fed a zip-tie through the hole and around the aluminim tent frame poles, back through the opposing hole in the panel and tightened them up. This proved a bit of a challenge in some areas as you needed to get the zips through the foam and they didn't always cooperate, then you needed to feed them over the pole and under the canvas which was sometimes a really tight fit, back through the foam (same problem as before), and then the freakin' zip would break right when you got it tight enough because the plastic was too cold. Arg!! There were a few places where zips wouldn't work because it was either too cold or there was too much tension on the panel, so we used multi-purpose household wire instead and twisted the ends together. But we did manage to get the panels up and secured; and sealed all the seams with 2" construction barrier tape (in this case blue, but it also comes in red which we used for the vapor barrier in the floor).
I hope you've enjoyed our little tour. Please tune back in for the exterior tour coming soon. Remember folks - there is almost nothing you can't build with some 2x4s and 1) blue plastic tarps, 2) Visqueen/poly-sheeting, 3) tape (esp. silver Duct tape!), 4) bungees, 5) some wire, and 6) zip-ties. Be creative!


19 comments:
I AM IN AWE!
--
Sam....
Seattle house? You're from Seattle? Wow. I'm enjoying reading your blog but I am sad that possibly the only couple crazier than I am no longer lives in the same city as me.
Thanks for the update. I've wondered about the tent. What do you use for heat? I noticed something in one of your posts that looked like a four or five dog stove.
I recently purchased a five dog stove with water jacket; I love it.
Another CM board member, living vicariously through you. I sincerely hope you two are planning on writing a book out of your experiences. What an extraordinary adventure. (You've kept me from whining through our recent Colorado cold snap. Minus 15 seems like a walk in the park compared with your weather!)
Stay warm and well,
Sue Sullivan
Fascinating, thanks for taking the time to show all of this. Great work.
Capesurvivor
Most of our friends and family thought we were "roughing it" when we moved into our 30' motor home for 2 years as we built our Cabin in WV. They should read your blog!
I really enjoy reading your Blog. I am taking notes, and would like to live the dream of living off the grid.
I've been reading your blog for many months and just wanted to say "thanks" for the updates and the wonderful info. Hopefully in the next year or two I'll be up there myself =)
Thanks again.
Nice digs.
Best of luck.
Thanks for posting.
.
Totally awesome low budget setup. Keep up the good work.
Stay warm.
You mention that your floor is very cold. Do you have exterior skirting to keep the air trapped under your tent deck? If you don't have skirting, perhaps you could pile snow to keep wind from blowing under the deck.
I hope you got enought fire wood.
Stay warm!!!
Hi and thanks for posting. We are fellow CM members, weaning ourselves from the grid and building a community in South Carolina. You are an inspiration to my husband and me.
Plickety Cat, I just found this! You guys are doing great! Now I'll have to go back and read more carefully -- I like what you've done with your tent!
Kathleen (Freeholder from Frontier Freedom forum!)
I am loving your blog. Found it searching for "living in a wall tent". I had a few questions, if that's okay.
1) I think you mentioned buying an angle kit for putting together the wall tent frame. Does that mean it came with that tent (i.e., the angle pieces are specifically calculated for that wall tent) and then bought the metal pipe separately?
2) It looks like your wall tent "rafters" are spaced about 4-5' apart. How have they held up under snow load (if you've had much)? Has there been any sagging of the tent canvas between rafters under the snow load?
3) How have your food supplies lasted? Did the LDS food storage calculator you used give an accurate estimate?
4) Is there anything you wish you had known about, or had bought, or had done, before you moved out there?
Thanks for the blog posts!
p.s. I hope you can get your cabin built before this winter. I worry about all that foam core you're using as insulation. That stuff burns fast and hot, and gives off acrid black smoke. But I'm sure right now it's that or freeze to death. ;-)
1) The angle kit was specifically designed for the pitch of the roof of our tent. Most wall tents nowadays either have their own frame kit or angle kit that fits their roof pitch.
2) The rafters are about 5' apart. They held up pretty well under the snow load, but we did go out and brush the snow off when the canvas started to sag. I think it would have held up ok, but I wasn't taking chances with the frame collapsing when knocking/brushing the snow off was easy enough.
3) Our food supplies lasted fine, actually we had a little more than needed. The LDS calculator is a great place to start, but you should factor in your particular eating preferences in there. For us, they recommended way too much grain since we are on a higher protein/lower carb diet. But the overall quantity was about right.
4) The one thing that really bit us was Gungnir's prescriptions. Although the pharmacy said they did them by mail, they really didn't. I will definitely get our doc to write the Rx for a full year and get them all at once so we don't have to drive in the winter to get the refills. The other thing is that mechanical engines don't run so well at -20 and below, at -50 you have to start stuff inside and hope it keeps running when you go outside.
p.s. The foam is just quick insulation for the tent so we didn't freeze, in the cabin we'll be using dense-pack blown cellulose... much healthier, even without a fire :D
Hi Jennie, my name's Norm. I was wondering if you could draw up a simple schematic showing how you hooked up your generator, fusebox, various outlets/lights and your batteries to make the electrical part of your tent safe. I'm in the process of designing a cabin in Michigan that is going to be off the grid and your idea would be invaluable...thanks.
HI Jennie,
Thanks for sharing the details of your set up. You've thought through quite a bit and have much to share. I have a couple of questions, forgive me if they've been addressed in other posts, I haven't had time to read the whole site.
1. I assume that your tent is on a platform, you also mention the floor tiles, what is the layering sequence and do you have any problem with ground moisture at any time of the year?
2. Your biffy (potty) set up would seem to work well, how are your shower facilities set up?
3. I love the idea of the insulation void for the fridge area in the corner. Are you concerned at all about critters having access to that because of any smells? Secondly, what is your cooling method for food in the summer?
I think my favorite area, besides the cozy bed, is the firewood crib. What a wonderful efficient use of space.
Thanks so much for sharing.
Andrea
Hi Andrea -
1) Yes, our tent was on a platform. We covered the joists with pressure treated plywood and then the standard vinyl ground cloth. In the areas directly in front of the zippers, we put vinyl peel & stick tiles down, and in the center of the room laid the industrial berber carpet. The only time we ever had any wet floor problems was right at breakup when the snow on the edge of the platform melted and seeped into the tent. I think when we set the tent up again, I'll put the sod cloth edge of the side walls out over the platform ledge rather than tucking them in towards the center. That should take care of any seeping.
2) Shower? Surely you jest!! :) We actually bathed in basins directly in front of the woodstove. Just folded up our living room furniture and then poured heated water over ourselves with pitchers and our Platypus water bag with the spray nozzle for a final rinse off.
3) We kept all our food in airtight containers to minimize any smells. Even our garbage was double-bagged and in a sealed bin during bear season. We didn't have too much problems with critters at all, other than a vole or two grabbing crumbs off the floor near the counter, but our cat Charlie took care of those quickly. In summer, we used a DC freezer for meats and such, and reusable blue-ice blocks that we swapped in and out of a cooler for the few perishables that absolutely needed to be cooler than room temperature. You'd actually be surprised at how many things "they" say need to be refrigerated that actually don't as long as they are stored in the appropriate container and aren't right in the heat or sun (eggs, butter, mayonnaise, cheese, etc).
this is awesome! I am an anarcho guy from Atlanta and I have been studying about this form of living for the past 3 years and its very simple good living, how ever im not sure id want to live in the states anyways this is great and ill keep reading as long as you keep posting, thanks!
Post a Comment